


For the best reading experience, click on the View in fullscreen button below.
[issuu layout=http%3A%2F%2Fskin.issuu.com%2Fv%2Flight%2Flayout.xml showflipbtn=true pagenumber=76 documentid=110107214822-713b6f12e7754a6b9a35340f59efc1ea docname=the-kiteboarder-february-2011 username=The-Kiteboarder-Magazine loadinginfotext=The%20Kiteboarder%20Magazine%20February%202011 width=600 height=391 unit=px]
Suffering Bladder Issues?
Build Your Own Replacements
By Jeff Howard/FixMyKite.com
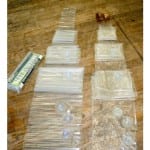
Photos Courtesy FixMyKite.com
While today’s kites are much more durable than the ones built a few years ago (just ask someone who’s been kiting for more than five years how often they had to repair bladders in the past), a damaged bladder is still a fairly common problem. If your kite has a bladder that is damaged beyond repair, you can easily buy a replacement bladder blank and self-stick valves to build your own replacement.

Whether you need to replace a leading edge or strut bladder, begin by determining the correct material and length of the blank needed. All kites today are manufactured using PU (polyurethane) bladders and anything else can deform and possibly make your kite fly incorrectly. If you still have the old bladder, measure its overall full length. The replacement can either be the same or longer, but never shorter than the original. Don’t worry about the diameter of the bladder as replacement blanks are made slightly bigger to eliminate this problem. If you do not have the bladder you need to replace, measure the casing and add at least two feet to the length.
Tools Needed:

- Correct bladder blank
- Correct self-stick valves
- Permanent marker
- Scissors
- A friend, if one is handy
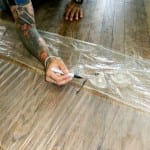
1. If replacing a leading edge, fold both the old and new bladders in half end to end and mark the center of each bladder.
2. Lay out both bladders with the old bladder on top, aligning the center marks (if replacing a strut, you don’t need to mark the center). Double check the ends making sure the new bladder is either the same length or longer.
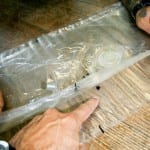
3. With everything lined up, make a small mark on the new bladder where the valves will be placed on the new blank. With inflate and deflate valves it’s important to make note of the valve direction and align correctly so you will still be able to use the Velcro valve closures.
4. Now that everything is marked you’re ready to install the self stick valves. Begin by cutting holes where the valves will be placed. Pinch the bladder top and bottom to separate the two layers where you made your mark. At the location of your mark fold the bladder to a point and cut the tip off creating a hole. This hole should be ½” to ¾” in diameter. Repeat this for every mark.
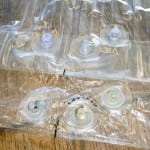


5. Using the supplied alcohol pads, clean the area around each hole. Before using the pads, squeeze the excess alcohol from the pad so you don’t leave any residue.
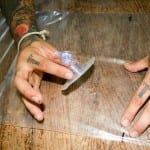
6. Having a friend on this next step is a big help. Lay the bladder out smooth on a flat surface at the location you want to place the valve. Remove the sticker backing and place the valve over the hole, firmly rubbing the valve from the center out toward the edges while making sure there are no creases or channels where air can flow under the valve.
7. Repeat this process for every valve and you’re ready to install the new bladder back in your kite, pump it up, and ride. It’s that easy!